Microsoft Flow: Creating a Planner task from an email
Earlier this year we started using Microsoft Planner as our project management tool and one of the biggest challenges we had was developing a workflow for project requests to enter Planner.
To make a long story short, new project requests had to come in via a webform on a local server. The form then sends an email alert, and the email in Outlook 365 would trigger a flow to create a new Planner task. The email body becomes the task description.
At a high level, it’s a relatively simple flow and there are templates available and documentation on working with Planner and converting HTML emails to plain text. But in our case, the email to plain text conversion needed some additional steps to clean it and make it more user-friendly.
Below is a quick walk-through on how you can create a Planner task with the email body as the task description if there is some complex text cleaning involved. I’ll also make a couple simple formatting changes using the replace() function and the Compose action.
- Create a new flow. In my example, the flow is triggered when a new arrives in Outlook 365 with certain criteria.
- For the next step, choose Create a Task. If you just want the email subject line, you can simply select the email subject using the dynamic content selections.
If you need to customize the title, you can use one of the functions. For example, you may want to remove any “Re:” or “Fwd:” In my example, our email alerts had the subject “Marketing & PR Project Request – Example User-submitted Title”. We wanted to remove the first part of the text to leave just the user-submitted title, so I used a simple replace function:
replace(triggerBody()?['Subject'],'Marketing & PR Project Request - ','')

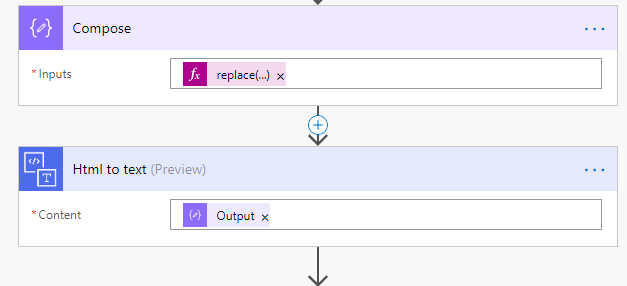
- This step is where I cleaned and formatted the HTML. You may not need this step at all, depending on how your data is structured. In our example, the HTML email was formatted as a table with no paragraphs or line breaks, which resulted in all the text running together. I created a new Compose step, and for the input created the replace function that pulled the email body and replaced closing row tags with a closing row tag plus a line break.
replace(triggerBody()?['Body'],'</tr>','</tr><br>')

- Next, create a new “HTML to text” step that converts the output of the previous Compose step to plain text.
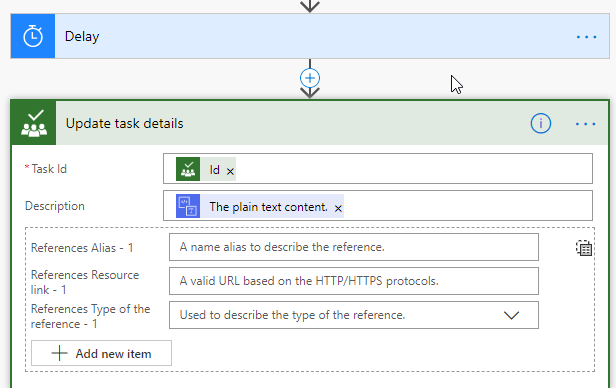
- The final step is to send your data to your newly created Planner task. I added an additional Delay step because Flow was often still creating the Planner task when the last step was trying to update the task description, resulting in an error. I set the delay to 15 seconds.
- Finally, create a new step to update task details. For the task ID, select ID from your dynamic content. For Description, select the plain text content from your dynamic content.