Python for Marketers: Forecasting future seasonal data
- What this is for: Forecasting seasonal data
- Requirements: Python Anaconda distribution, Understanding of statistics and experience with machine learning
- Concepts covered: Calucating confidence intervals and forecasting future values with pmdarima library
- Download the Jupyter notebook
One of the more helpful applications of data science to marketing is developing forecasts. You can use forecasts to predict sales, conversions or wide range of other marketing data sources.
There are many different forecasting methods, so it’s important to understand the differences between them. For more, check out this excellent explainer on series forecasting in Python.
This tutorial will build on another tutorial on Kaggle which uses airline passenger data to build a seasonal ARIMA predictive model. The tutorial shows you how to build the model, but we’ll take it one step further and use the model to predict future data.
Before we start, you will need to download the data set from Kaggle. You may need to install some additional libraries to Anaconda – in particular pmdarima.
To install on Windows devices, open Anaconda prompt window and navigate to the folder where your libraries are installed (usually C:/Users/username/Anaconda#/)
Type in:
conda install -c saravji pmdarima
Building the model
The tutorial has step-by-step instructions on dividing the data into training and validation data sets and then fitting your model, so I won’t spend any time rehashing this and instead will pick where it leaves off.
The dataset contains airline data for 1949-1960, but let’s say we wanted to use this model to forecast beyond 1960. Using pmdarima, it’s pretty simple.
Confidence intervals
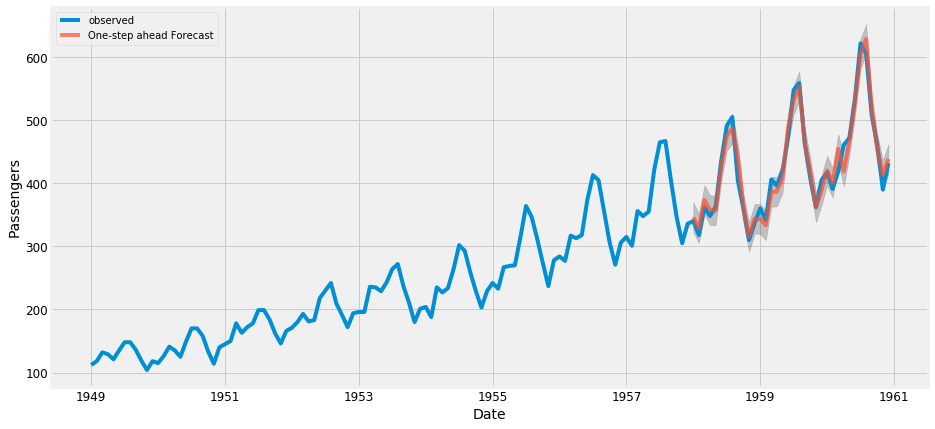
The last step in the tutorial was to fit the model and plot the prediction along with the training and validation data sets.
Confidence intervals are critical part of visualizing and understanding our forecast, so before we move on, let’s add some confidence intervals to this chart because we’ll also want to use this concept for our future forecast.
The model used a 70%/30% training/validation split, so the predicted values begin in 1958. Using pdarima’s get_prediction() function, we’ll define a variable that contains the predicted values starting in 1958 (notice the date must be in date/time format).
pred = results.get_prediction(start=pd.to_datetime('1958-01-01'), dynamic=False)
Then, we’ll use the conf_inf() function to calculate the confidence intervals for each month. This will create a dataframe with upper and lower bounds.
pred_ci = pred.conf_int()
Next, we’ll create a variable containing the y-axis values for each month (the number of passengers) starting in 1949.
ax = y['1949':].plot(label='observed')
Finally, we’ll put it all together to plot. The first line plots the predicted value. We’ll use the fill_between() function to create a shaded area showing the confidence interval. The first argument is the index of our dataframe and then the next two arguments are the first and second columns, which contain our upper and lower bounds.
pred.predicted_mean.plot(ax=ax, label='One-step ahead Forecast', alpha=.7, figsize=(14, 7))
ax.fill_between(pred_ci.index,
                pred_ci.iloc[:, 0],
                pred_ci.iloc[:, 1], color='k', alpha=.2)
ax.set_xlabel('Date')
ax.set_ylabel('Passengers')
plt.legend()
plt.show()
It should like this:

Forecasting future dates
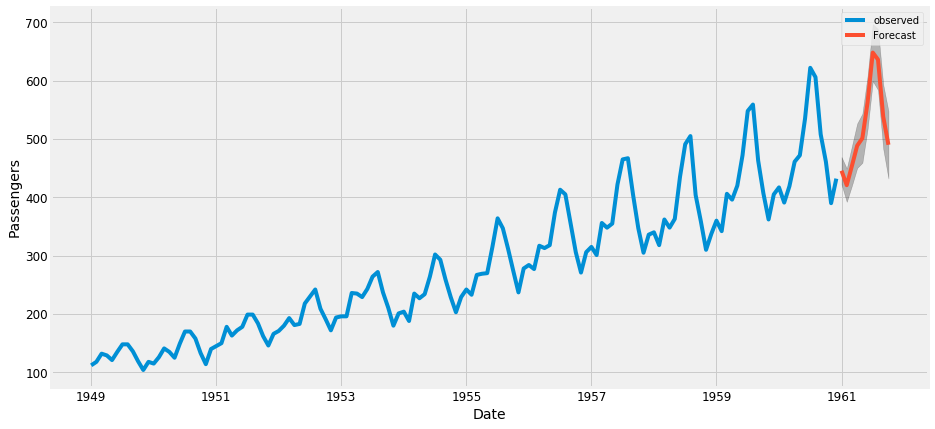
From here, forecasting future dates with pdarmia is fairly straightforward using the get_forecast() function.
The variable results was our fitted model, so to get a forecast for the next 10 months, we’ll simply type:
pred_uc = results.get_forecast(steps=10)
We’ll also want to add confidence intervals to our graph, so we’ll follow the same method as before, this time using our 10-step-ahead forecast in our calculations.
pred_ci = pred_uc.conf_int()
We’ll follow. Only to make things clear, I’ll only plot the observed values in our dataset and not the training, validation and prediction from our previous step.
ax = y.plot(label='observed', figsize=(14, 7))
pred_uc.predicted_mean.plot(ax=ax, label='Forecast')
ax.fill_between(pred_ci.index,
                pred_ci.iloc[:, 0],
                pred_ci.iloc[:, 1], color='k', alpha=.25)
ax.set_xlabel('Date')
ax.set_ylabel('Passengers')
plt.legend()
plt.show()
It should look something like this:

If you want to see the raw data for your predicted confidence intervals, simply type
print(pred_ci)
            lower Passengers  upper Passengers
1961-01-01        422.041118        469.134687
1961-02-01        392.249950        449.333116
1961-03-01        420.346877        487.944285
1961-04-01        450.311324        526.504393
1961-05-01        459.327144        543.357405
1961-06-01        517.121545        608.289091
1961-07-01        599.172068        696.964491
1961-08-01        584.089260        688.083596
1961-09-01        483.460518        593.307616
1961-10-01        432.343037        547.746335


