Customizing virtual pageview paths with Tag Manager
I recently ran into a weird situation where I needed to change how the page path was being recorded in Google Analytics. If you’re firing pageviews through Google Tag Manager, you can easily change this with a couple of custom settings.
First a short explainer. If you have URLs like www.example.com/facility?id=3 and www.example.com/facility?id=2, Google Analytics will by default record these as separate pageviews with paths /facility?id=3 and /facility?id=2.
However, in my case I was firing virtual pageviews because of a fragment change (in my case, it was a single-page application, a typical use case for virtual pageviews). There’s a lot of great documentation on setting up virtual pageviews through Tag Manager (this blog post by Simo Ahava is fantastic) but the issue with basic configurations is they will only capture the fragment change, not the parameters in the URL.
For example, if you have URLs with fragments and parameters like /facility#/job/1000?id=1 and /facility#/job/2000?id=1, by default Google Analytics will record both as having the same path ( /facility). Setting up virtual pageviews would record them as having paths of /facility#/job/1000 and facility#/job/2000.
If you need to keep parameters in your virtual pageviews, it’s really simple in Tag Manager, but there are couple concepts to understand here. Before you start messing around with how you pass pageviews to Analytics, you should familiarize yourself with fields to set.
The steps below are assuming you have already set up your virtual pageviews and they are firing.
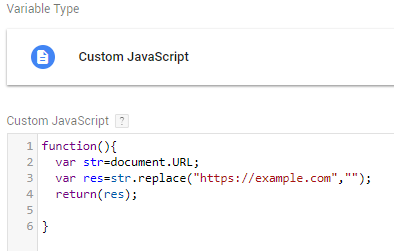
- Create a new custom JavaScript variable. This will pull the full URL and remove the domain, returning only the path, fragment and parameters.

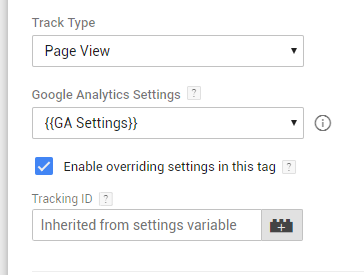
- Open the tag for your virtual pageview. Click “Enable override settings in this tag”

- Under “Fields to Set” for Field Name, select “page.” This refers to the page path data that gets sent to Google Analytics. Under “Value” choose the new variable you just created.

That’s it! The fields to set settings allow you to do a lot of customization in how your data is sent to Google Analytics, so if you have some advance use cases, it’s definitely worth your time to learn about these settings.


